

Adding Logos
How logos get into a block — uploading or picking them, editing each one's details, grouping them into categories, putting them in order, and what happens when an image goes missing.
Every Logo Carousel block works the same way: it holds its own list of logos, and every logo is an image from your WordPress Media Library. This page is the reference for that list. It applies to all five blocks — Carousel, Grid, List, Marquee, and Table.
New to blocks?
Read the Blocks Overview first — it explains what a block is and how to insert one. Come back here when you're ready to add logos.
How logos are stored
It helps to know three things before you start:
- A logo is a Media Library image plus a few details. The image stays in your Media Library; the block stores which image to use, along with the logo's title, link, description, and categories.
- Each block has its own list. Adding a logo to one block doesn't add it to any other. If you want the same set on several pages, build it once and save it as a Saved Template, or copy the block.
- Blocks don't use the All Logos screen. The logo posts under Logo Carousel → All Logos belong to the classic views. Blocks pick images straight from the Media Library instead.
The add-logos workflow
When you insert a block, it walks you through a few screens right on the editor canvas.
1. Create Your Logo Showcase
The start screen offers up to three buttons:
- Use a Pattern — insert a design from Ready Patterns. It arrives with demo logos, which you then replace.
- Build with AI — describe what you want and let the AI Builder set it up.
- Start Blank — go to the next screen and add your own logos.
2. Choose Logo Images
This is where your logos come from. You have two buttons:
- Upload Logo Images — opens your computer's file picker. You can choose several files at once.
- Media Library — opens the WordPress media window, titled Choose Logo Images. Tick as many images as you like, then click Use Logo Images. Logos already in the block show as ticked.
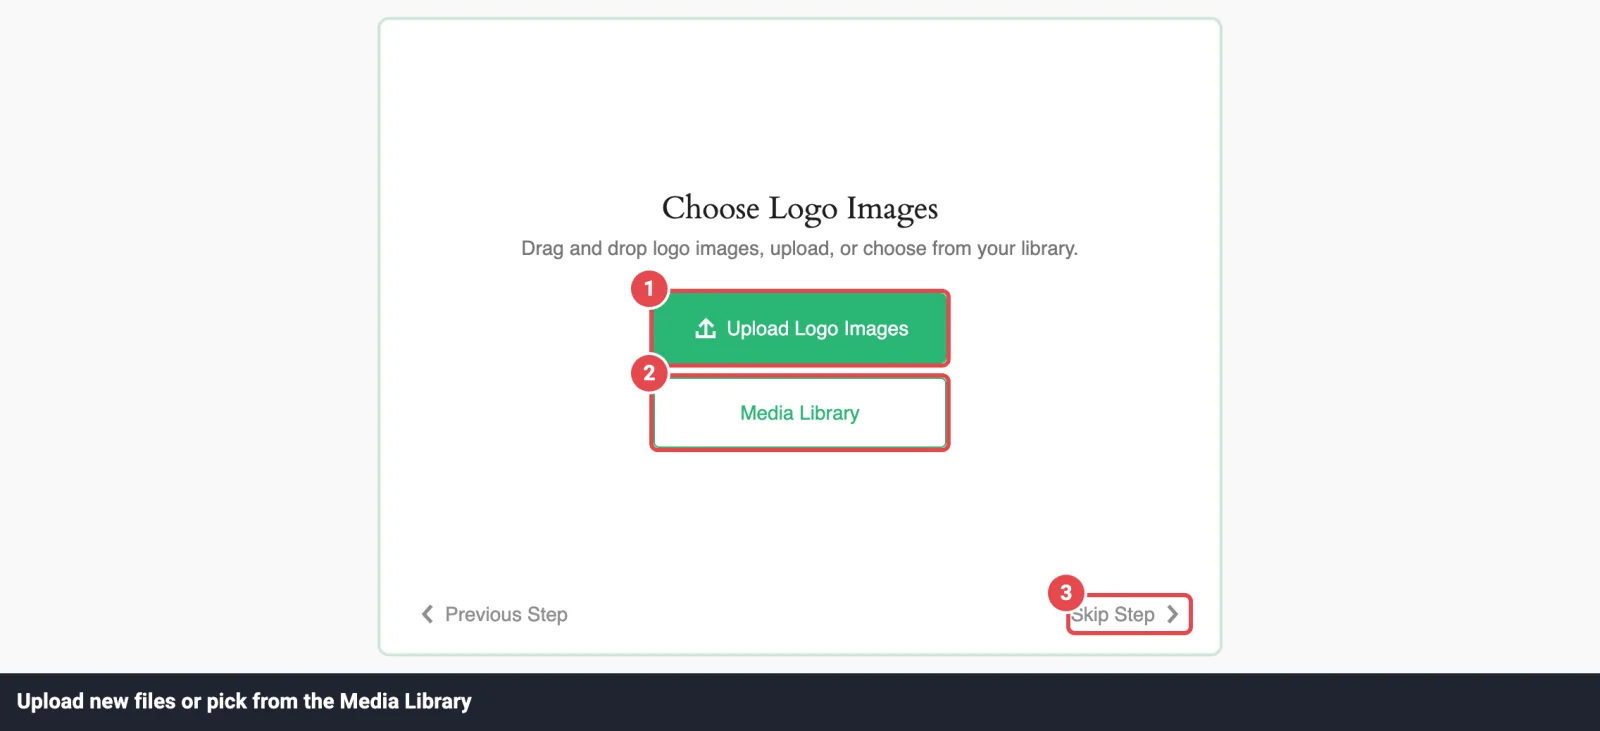
Previous Step takes you back to the start screen. Skip Step jumps straight to the block preview with no logos — handy if you want to set up the layout first.
Which files you can add
- PNG, JPG, GIF, and WebP always work.
- SVG works for administrators while Allow SVG Uploads is on in the block's Logo Images panel (it's on by default). Uploaded SVG files are cleaned on the server to strip anything unsafe.
- Each file must fit within your site's WordPress upload limit. A file that's too big or the wrong type is skipped with a message that names it.
Uploading the same file twice is fine
Before uploading, the plugin checks whether the exact same image is already in your Media Library. If it is, it reuses that image instead of creating a duplicate, and tells you: "This image already exists, so we reused the existing logo instead of creating a duplicate." A logo that's already in the block isn't added a second time either.
3. Selected Logo Images
After you upload or pick, you'll see your logos as a grid of thumbnails titled Selected Logo Images. Here you can:
- Drag thumbnails into the order you want.
- Click the pencil on a thumbnail to edit that logo.
- Click the trash icon to remove a logo from the block straight away.
- Click Edit Logo Images to open the editor on the first logo and step through them all.
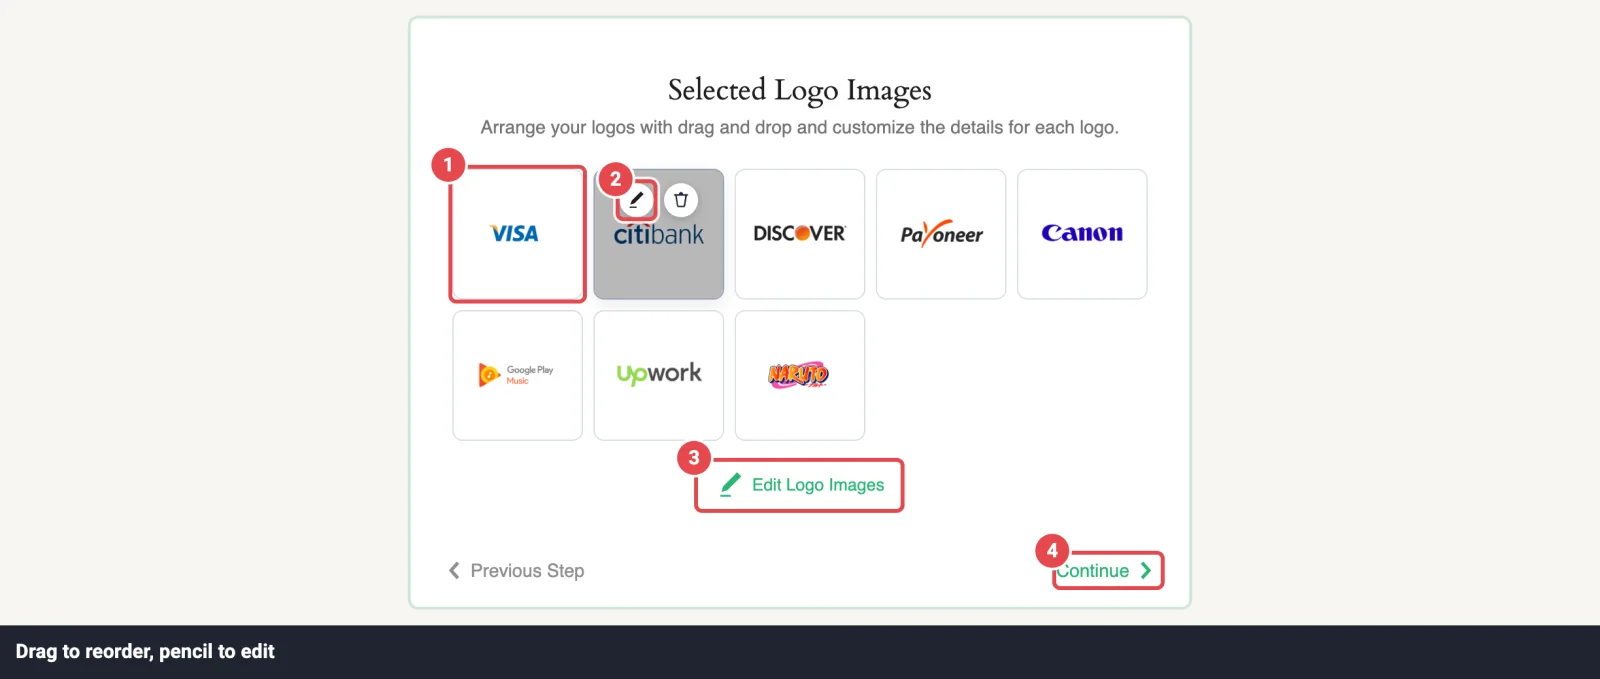
Click Continue and the block switches to a live preview of your logos. That's it — you can start styling in the inspector.
Adding more logos later
Once a block has logos, select it and use the block toolbar (the bar that appears above the selected block):
- Add Logos opens the Media Library with your current logos ticked. Tick more, click Use Logo Images, and the new ones are added to the end.
- Edit Logos reopens the Selected Logo Images screen so you can reorder, edit, or remove.
The Logo Images panel in the inspector gives you the same tools, and more — see Managing logos in the sidebar.
Edit a logo
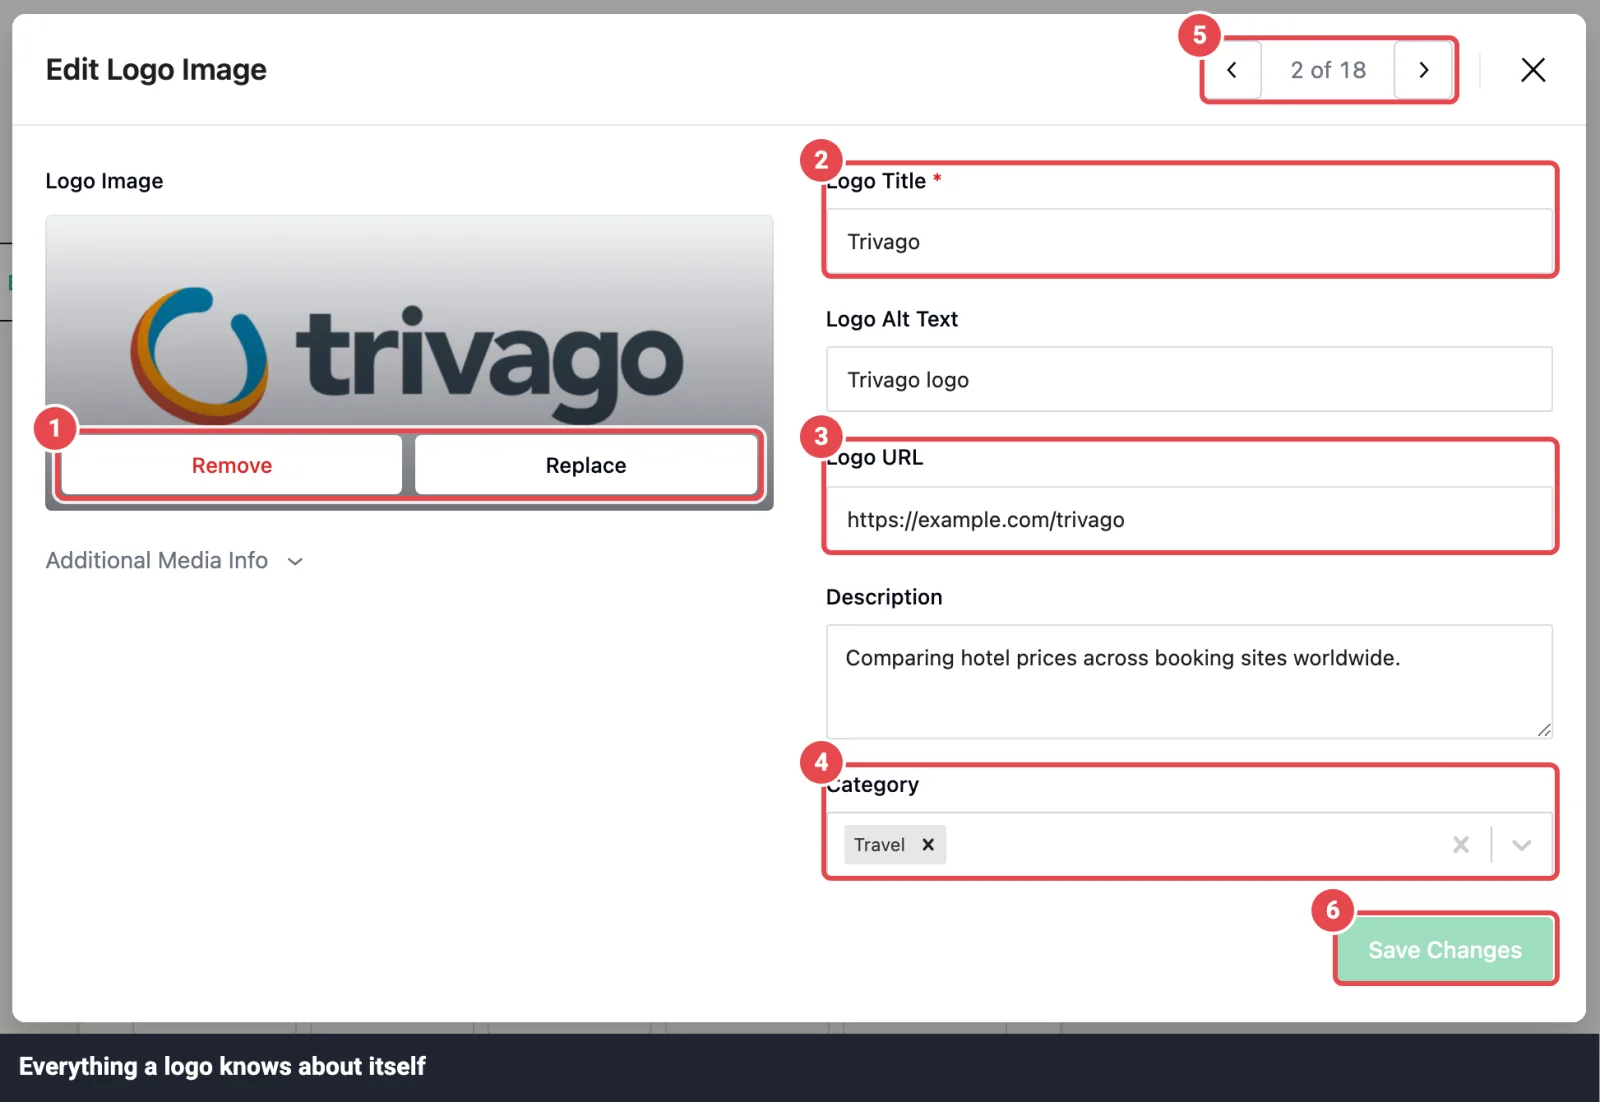
Click the pencil on any logo to open the Edit Logo Image window. The left side shows the image; the right side holds the logo's details.
| Field | What it's for | Limits |
|---|---|---|
| Logo Title (required) | The company or brand name. Shown by Display Elements, tooltips, and the details popup, and used as the image's hover title. | Up to 120 characters. |
| Logo Alt Text | What screen readers announce. If you leave it empty, the title is used. | Up to 125 characters. |
| Logo URL Pro | Where the logo links to, when the block's Click Actions is set to Logo URL. | Must start with http:// or https://. |
| Description Pro | A sentence or two about the company. Shown by Display Elements, tooltips, and the details popup. | Up to 500 characters. |
| Category Pro | One or more labels for grouping — see Logo categories. Type a new name and press Enter, or pick one already used in this block. | Up to 20 per logo, 80 characters each. |
When a new logo is added, its title, alt text, and description are filled in from the image's own Media Library details. If the image has no title, one is made from the file name: acme-corp.png becomes "Acme Corp".
Working through several logos? Use the arrows in the window's header (or the ← and → keys) to step to the previous or next logo. If you've changed something, you'll be asked to Save & Continue or Discard first.
Saving. Click Save Changes. The window stays open and shows Changes saved, so you can carry on. If you close it with unsaved edits, it asks whether to keep editing or discard them.
Your edits also update the Media Library
When you save, a changed title, alt text, or description is written back to the image in your Media Library too, so the image and the logo stay in sync. It works the other way as well: if you edit the image in the Media Library (the Edit details link opens it in a new tab), the window picks up those changes when you come back — as long as you haven't edited the same field here.
Other things in this window:
- Replace swaps the image for another from your Media Library. The logo keeps its title, link, description, and categories.
- Remove deletes the logo from the block, after asking you to confirm.
- Additional Media Info (click to expand) shows the file name, type, size, dimensions, and caption.
Where's "open in a new tab" or "nofollow"?
There isn't a per-logo setting for that. Logo links always open in a new tab with rel="noopener noreferrer". Whether logos link at all is decided for the whole block by Click Actions in the Logo Images panel — see Carousel → Logo Images.
Logo categories
Pro Categories are simple labels you put on logos — Partners, Sponsors, Gold, Europe. A logo can have several.They matter because other features use them:
- The Ajax Live Filter turns them into buttons or a dropdown, so visitors can show one group at a time.
- Ajax Search matches against them as well as titles and alt text.
- The logo details popup shows them as small tags.
There's no separate list of categories to manage. A block's categories are simply all the categories its logos carry. Add one to a logo and it exists; remove it from every logo and it's gone. Each block has its own set.
Two ways to add categories:
- One logo at a time — in the Category field of the Edit Logo Image window.
- Many logos at once — in the inspector's Logo Images panel, tick the logos you want, click Category in the bar that appears, choose existing categories or type a New category and click Add, then click Apply.
Bulk-adding never removes a category a logo already has. Names are matched without caring about capitals, so typing partners reuses an existing Partners rather than creating a second one.
Not the same as "Logo Categories" in the admin menu
Logo Carousel → Categories manages categories for the classic logo posts. Block logos don't use them — their categories live inside the block.
Managing logos in the sidebar
Select the block and open the Logo Images panel in the inspector. Its Settings tab starts with a logo manager:
- A thumbnail for every logo, 12 at a time — click See More for the next 12.
- A Select All checkbox and a count, like 8 of 20 logos.
- On each thumbnail, a checkbox, an edit button, and a remove button.
- When you've ticked some logos, a bar shows how many are selected, with Category and Delete actions.
- Edit Logo Images at the bottom opens the Selected Logo Images screen on the canvas.
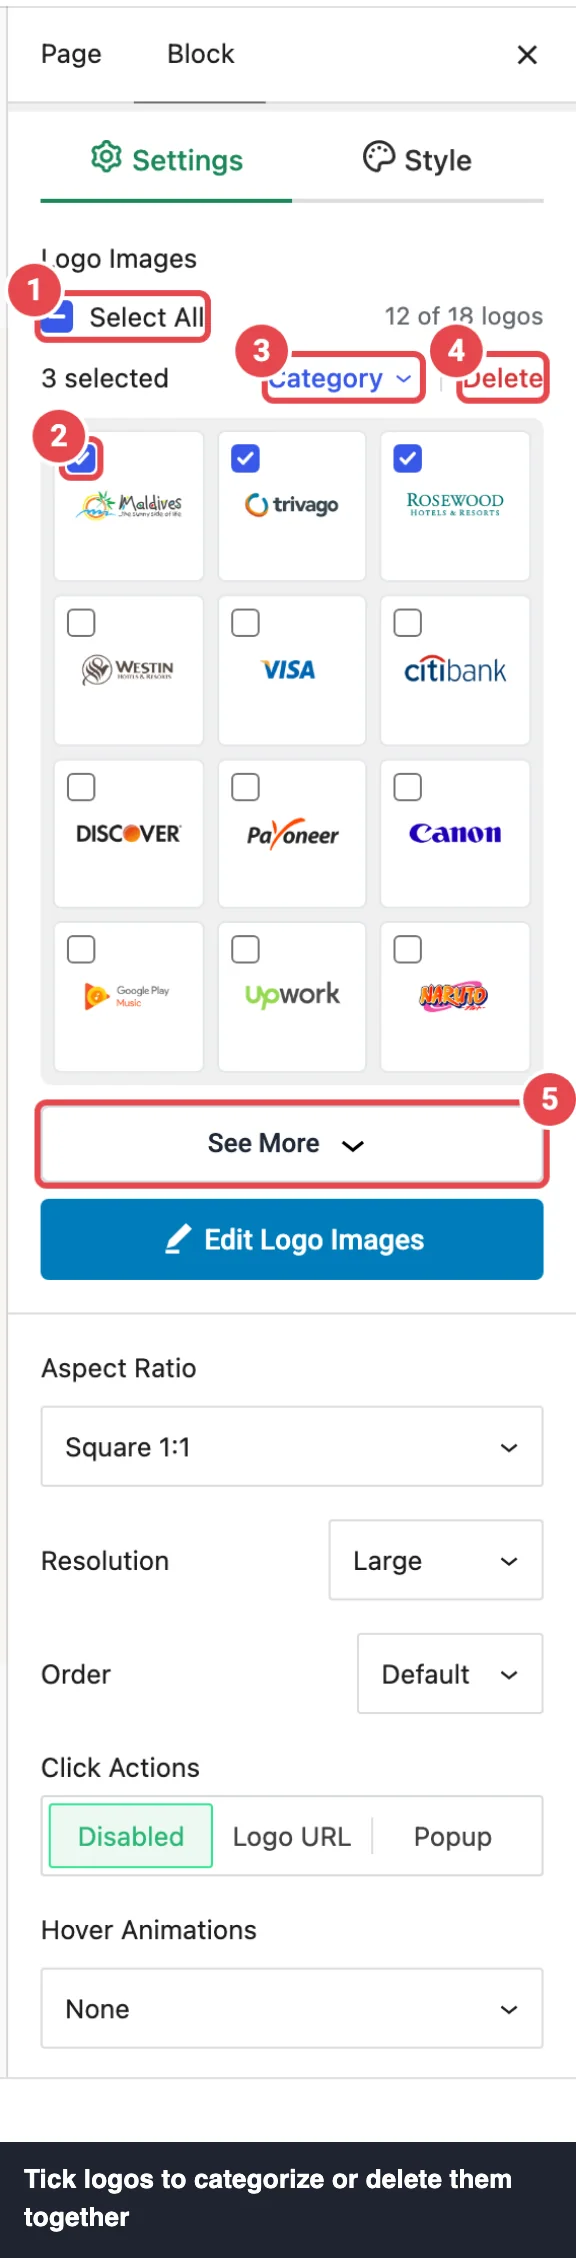
If the block has no logos yet, the panel instead says Add logos to enable style options — click Add logos to open the Media Library.
Reorder logos
Logos appear in the order you set. To change it, drag thumbnails on the Selected Logo Images screen or in the Logo Images panel. Dragging works with the keyboard too: focus a thumbnail, press Space to pick it up, move it with the arrow keys, and press Space again to drop it.
Want a different order on every page load? Turn on Random Display Order Pro in the Logo Images panel (Grid, List, and Table call it Order → Random). Your saved order stays as it is; visitors just see the logos shuffled.
Remove logos
You can remove a logo from the trash icon on the review screen, the remove button in the sidebar, or Remove in the Edit Logo Image window. To remove several, tick them in the Logo Images panel and click Delete — you'll be asked to confirm.
Removing a logo only takes it out of this block. The image stays in your Media Library, and other blocks using it aren't affected.
If you remove every logo, the block goes back to its start screen.
Replacing demo logos
Blocks made with Use a Pattern or Build with AI arrive with demo logos so you can see the design. While they're in place, the editor shows a note under the block: "This block uses demo logo images for preview only. Please replace them with your own logo images."
To swap them out, select the block and click Edit Logos in the block toolbar. The Media Library opens with nothing ticked — choose your own logos, and they replace the whole demo set in one go. The design stays exactly as it was. (Cancel without choosing anything and the demo logos are kept.)
Big collections
The block handles large sets, but it helps to know where the limits are:
| Logos in the block | What happens |
|---|---|
| 100 or more | The sidebar shows logos in batches to stay quick. |
| 250 or more | A warning suggests splitting the collection across several blocks. |
| 500 | The maximum. Adding more is blocked until you remove some. If you pick more than will fit, only the ones that fit are added. |
For long lists, Grid, List, or Table with Pagination is easier on visitors than one huge carousel. See Performance.
Missing images
If an image is deleted from the Media Library — or its file stops loading — the block doesn't break. That logo shows a grey placeholder reading Image Missing with the logo's title, so you can see which one needs attention.
- In the editor, the placeholder carries a warning mark, and the logo's link and popup are switched off until it's fixed.
- On the live site, visitors see the same neutral placeholder rather than a broken-image icon. Screen readers announce it as "Missing logo: [title]".
- To fix it, open the logo's Edit Logo Image window and click Replace to choose a new image, or remove the logo. If you restore the image to the Media Library, the block notices and shows it again.
Troubleshooting
| Symptom | Likely cause | Fix |
|---|---|---|
| A file is refused | It's not PNG, JPG, GIF, WebP, or SVG, or it's larger than your upload limit. | Convert or shrink it. See Requirements. |
| SVG files are refused | You're not an administrator, or Allow SVG Uploads is off in the Logo Images panel. | Ask an administrator, or turn the setting on. |
| Upload and Media Library buttons are greyed out | The block has reached 500 logos. | Remove some, or split the logos across blocks. |
| The Category field, Logo URL, or Description is locked | You're on the free version. | These are Pro fields. See Free vs Pro. |
| A logo doesn't link anywhere | Click Actions is set to Disabled, or that logo has no Logo URL. | Set Click Actions to Logo URL and add the URL. |
| The filter shows no buttons | No logo in the block has a category yet. | Add categories, as described above. |
Next steps
- Style your logos in Carousel → Logo Images.
- Show titles and descriptions with Display Elements.
- Let visitors filter by category with the Ajax Live Filter.
- Build a full directory in the partner directory tutorial.